Discord UI 使用
Discord.ext 提供許多 UI 元件來優化使用者體驗,而不需要以純文字、接收數個參數等繁雜處理方式來獲得我們所需要的資訊。以下將說明如何使用 Discord UI 元件。
首先,大部分網路上的作法都是將需要用到的 UI 元件逐個加入到一個 discord.ui.View 的 class 當中,所以需要先創建一個 discord.ui.View 的 class
class MyView(discord.ui.View):
    def __init__(self):
        super().__init__()
當把所有 UI 元件加入至這個 class 之後,將此作為 discord.ext.commands.Context 中 view 屬性的對應值,就能成功發送至 Discord 聊天室。
記得要在 MyView 後面加上 () 表示是由 MyView 這個 class 所生成出來的物件,如果不知道為什麼,請先去看 OOP。
@client.hybrid_command()
    async def test(ctx: commands.Context):
        await ctx.send(content="This is Test.", view=MyView())
那麼要怎麼將 UI 元件加入這個 class 當中?
首先要知道部分 UI 元件有分為 shortcut decorator 的用法和 class/object 的用法,注意他們在名稱上可能只有大小寫的差別,所以要清楚當前使用的 UI 元件要以什麼形式加入 class 當中,才能順利的組合出想要的 UI 互動
方法一:使用 UI 元件的 Class
我們可以使用 discord.ui.View 中的 add_item 方法來加入類別形式的 UI 元件,如下:
class MyView(discord.ui.View):
    def __init__(self):
        super().__init__()
        self.add_item(...) # 加入需要的 UI 元件
以 Button UI 作為範例,如下:
class MyView(discord.ui.View):
    def __init__(self):
        super().__init__()
        self.add_item(discord.ui.Button(label="Click Me!", style=discord.ButtonStyle.link, url="https://www.google.com/"))
方法二:使用 shortcut decorator 的方式建立 UI 元件
以 shortcut decorator 的方式建立 UI 元件,會需要建立一個同步回傳函式,用來處理該 UI 被觸發的後續動作。因此用這種方式建立的 UI 元件的變化性更高,只是不能像類別形式的 UI 元件一樣寫成 One Line Code 的形式。
class MyView(discord.ui.View):
    def __init__(self):
        super().__init__()

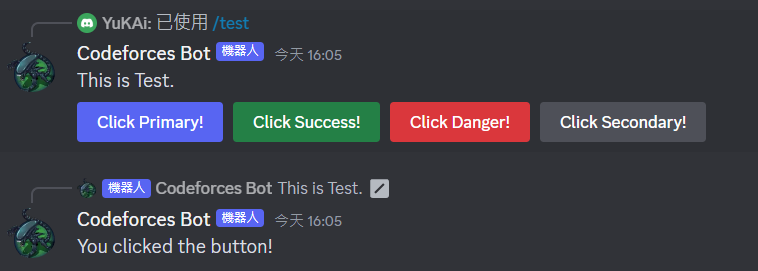
    @discord.ui.button(label="Click Primary!", style=discord.ButtonStyle.link)
    async def button_callback1(self, interaction, button):
        await interaction.response.send_message("You clicked the button!")
你可以發現在 Button UI 元件的不同實現上,分別是 discord.ui.button 和 discord.ui.Button,說明大小寫是會影響程式的,因此在搭配更複雜的元件組合時要小心這些細節
各種 UI 元件的詳細使用方式
接下來,將對 Button、DropDown(Select Menu) 和 Dialog 做詳細的實作說明
Button
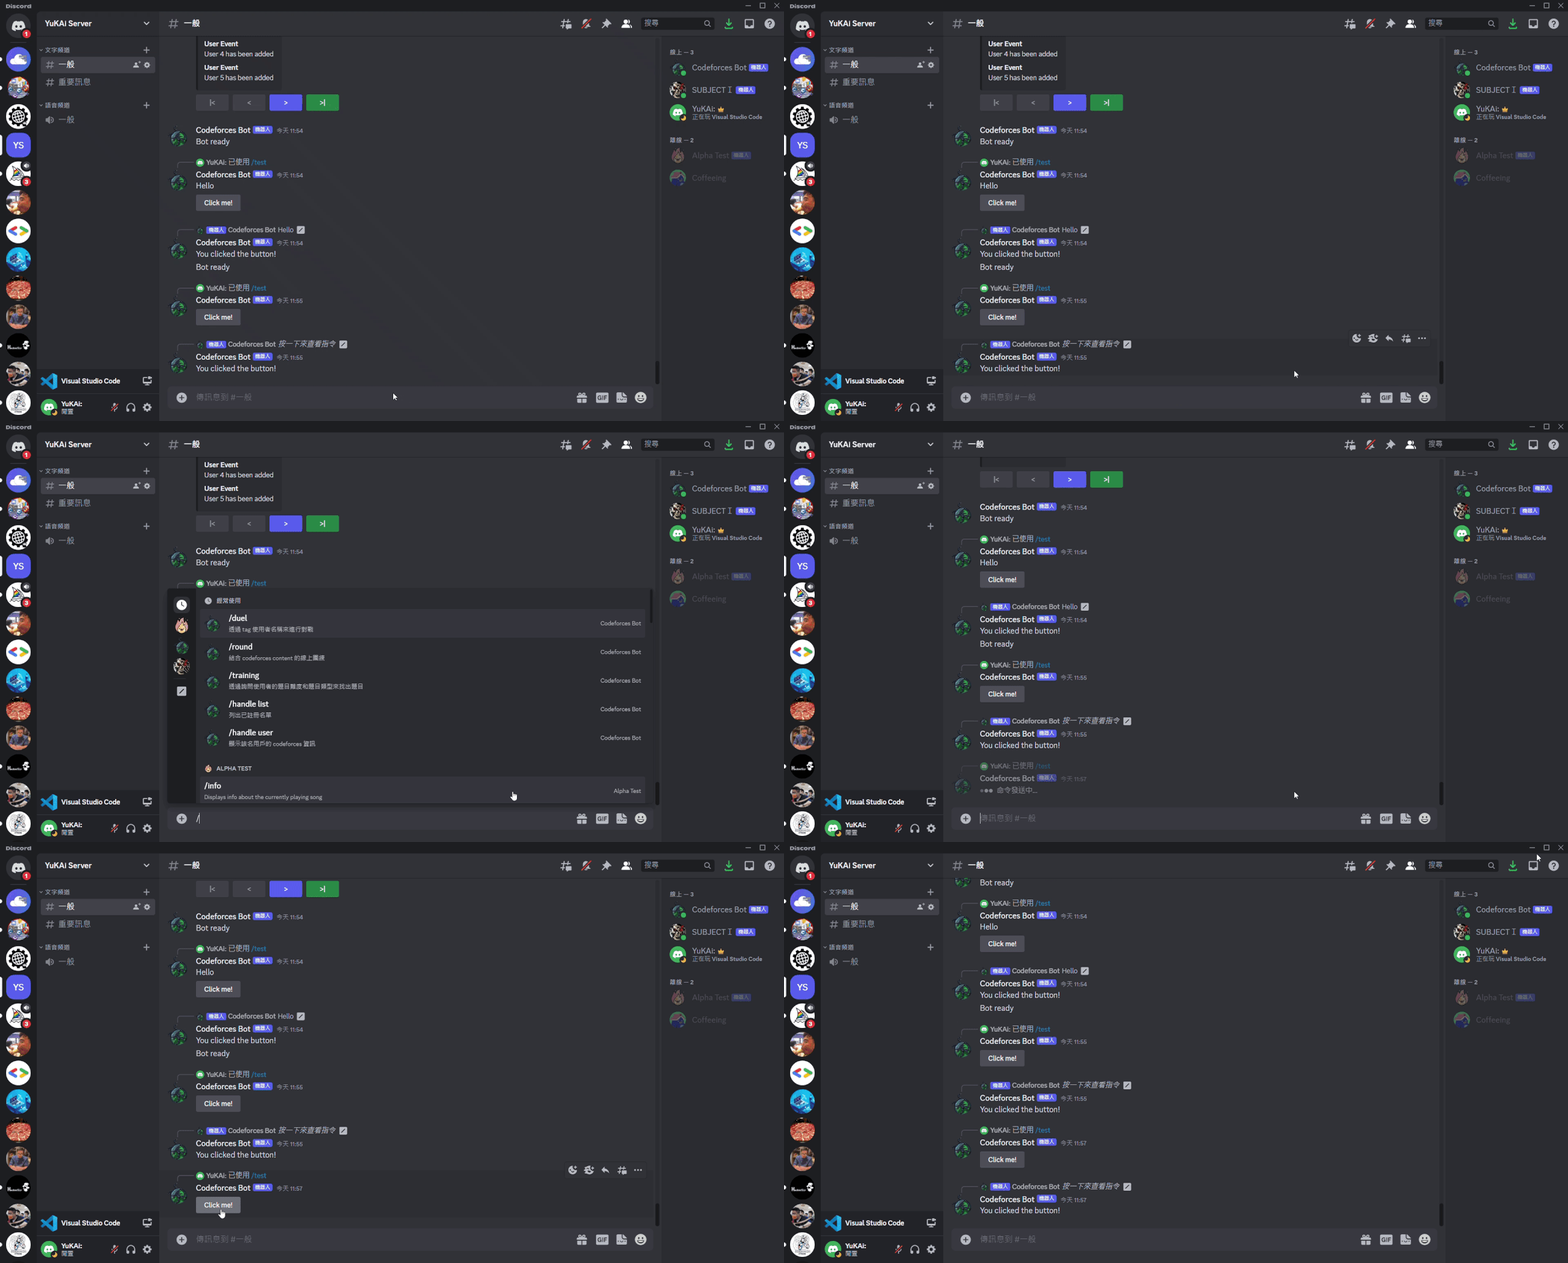
之前的範例有提到如何實現一個按鈕,這邊就簡單的做個說明如何實現一顆按鈕
class MyView(discord.ui.View): # 創建一個 ui 事件的 class
    def __init__(self):
            super().__init__()

    @discord.ui.button(label="Click me!") # 使用 discord.ui.button 來創建按鈕
    async def button_callback(self, interaction, button): # 當按鈕被觸發時所做出的回應
        await interaction.response.send_message("You clicked the button!")

實現多顆按鈕
如果要用多顆按鈕可以參考以下寫法:
class MyView(discord.ui.View):
    def __init__(self):
        super().__init__()
        self.add_item(discord.ui.Button(label="Click Me TO YT!", url="https://www.youtube.com/"))
        self.add_item(discord.ui.Button(label="Click Me TO Google!", url="https://www.google.com/"))

    @discord.ui.button(label="Click 1!")
    async def button_callback1(self, interaction, button):
        await interaction.response.send_message("You clicked the button 1!")
    @discord.ui.button(label="Click 2!")
    async def button_callback2(self, interaction, button):
        await interaction.response.send_message("You clicked the button 2!")
更多按鈕樣式
若要為按鈕添加更多樣式,可以添加 style 屬性,如下:

導向外部網站
如果要導向外部網站,要簡單的話,使用類別形式(discord.ui.Button)來實現即可,因為只有這個類別才提供 url 屬性,不然就是要自己再寫其他導向的方法在回傳函式當中
class MyView(discord.ui.View):
    def __init__(self):
        super().__init__()
        self.add_item(discord.ui.Button(label="Click Me!", style=discord.ButtonStyle.link, url="https://www.google.com/"))
更多的使用方法可以參考 Discord Button UI
DropDowns
DropDowns(Select Menu) 提供下拉式選單的互動方式,讓使用者在多個選擇的情況下,有更良好的體驗,以下是實現一個 DropDowns(Select Menu) 的簡單作法:
_list = ["Coffee", "Soda", "Tea", "Lemonade", "Mike"]
    def __init__(self):
        super().__init__()

    @discord.ui.select(
        placeholder = "選擇你喜歡的飲料",
        min_values = 1,
        max_values = 3,
        options = [discord.SelectOption(label = data) for data in _list],
    )
    async def callback(self, interaction, select):
        await interaction.response.send_message(f"You choose {' '.join([data for data in select.values])}!!")
這是使用 shortcut decorator 的 discord.ui.select 來實現 DropDown 的方法,可以透過 select 接收到所選取的選項。
但如果是要用類別形式的 DropDown 來實現,就需要先覆寫其 callback 方法,並呼叫 interaction.data 屬性才能取得所選取的選項,如下:
_list = ["Coffee", "Soda", "Tea", "Lemonade", "Mike"]
class MyView(discord.ui.View):
    def __init__(self):
        super().__init__()
        self.add_item(MySelect(options=[discord.SelectOption(label = data) for data in _list], min_values=1, max_values=3))

class MySelect(discord.ui.Select):
    async def callback(self, interaction):
        await interaction.response.send_message(f"You choose {' '.join([data for data in interaction.data['values']])}!!")

discord 的內建選單
discord 的內建選單,諸如:
- 該伺服器的使用者清單(User Select)
- 該伺服器的身分組清單(Role Select)
- 該伺服器地提及清單(Mention Select)
- 該伺服器的頻道清單等(Channel Select)
這裡的實作方式與官方的 Document 上的方法大為不同(因為不知道為什麼明明版本沒問題,但就是找不到官方的屬性)。
如果對官方的寫法有興趣可以查詢 shortcut decorator 中關於 discord.ui.user_select 的作法,如果有成功做出來,那應該會比這裡所寫的還簡單很多,到此為止,來看看我如何實現 discord 的內建選單(以 User Select 做示範):
- 一樣創建一個
discord.ui.View的class,並把新定義的discord.ui.UserSelect放入當中 - 接著在新定義的
discord.ui.UserSelect中,繼承原有的屬性,並加入新的屬性(client) - 覆寫
callback方法,獲取interaction.data['value'],這一個陣列所儲存的是被選中的user id - 如果要透過
user id轉為其他user資訊的話,就需要用到剛剛所加入的client屬性,這是一個commands.Bot物件,可以透過get_user解析user id來獲取user完整資訊 - 記得要將
discord Bot丟入新開的client屬性
class MyView(discord.ui.View):
    def __init__(self, client):
        super().__init__()
        self.add_item(MySelect(min_values=1, max_values=3, client=client))

class MySelect(discord.ui.UserSelect):
    def __init__(self, client: commands.Bot, min_values: int = 1, max_values: int = 1):
        super().__init__(min_values=min_values, max_values=max_values)
        self.client = client
        self.selectUser = []

    async def callback(self, interaction):
        for id in interaction.data['values']:
            user = self.client.get_user(int(id))
            self.selectUser.append(user.name)
        await interaction.response.send_message(f"You choose {' '.join(self.selectUser)}")
@client.hybrid_command()
    async def test(ctx: commands.Context):
        await ctx.send(content="This is Test.", view=MyView(client=client))
interaction.data['values'] 全部都是 id,若需要近一步完整資訊可參考上面 User Select 透過 discord bot 解析 id 的方法Dialog
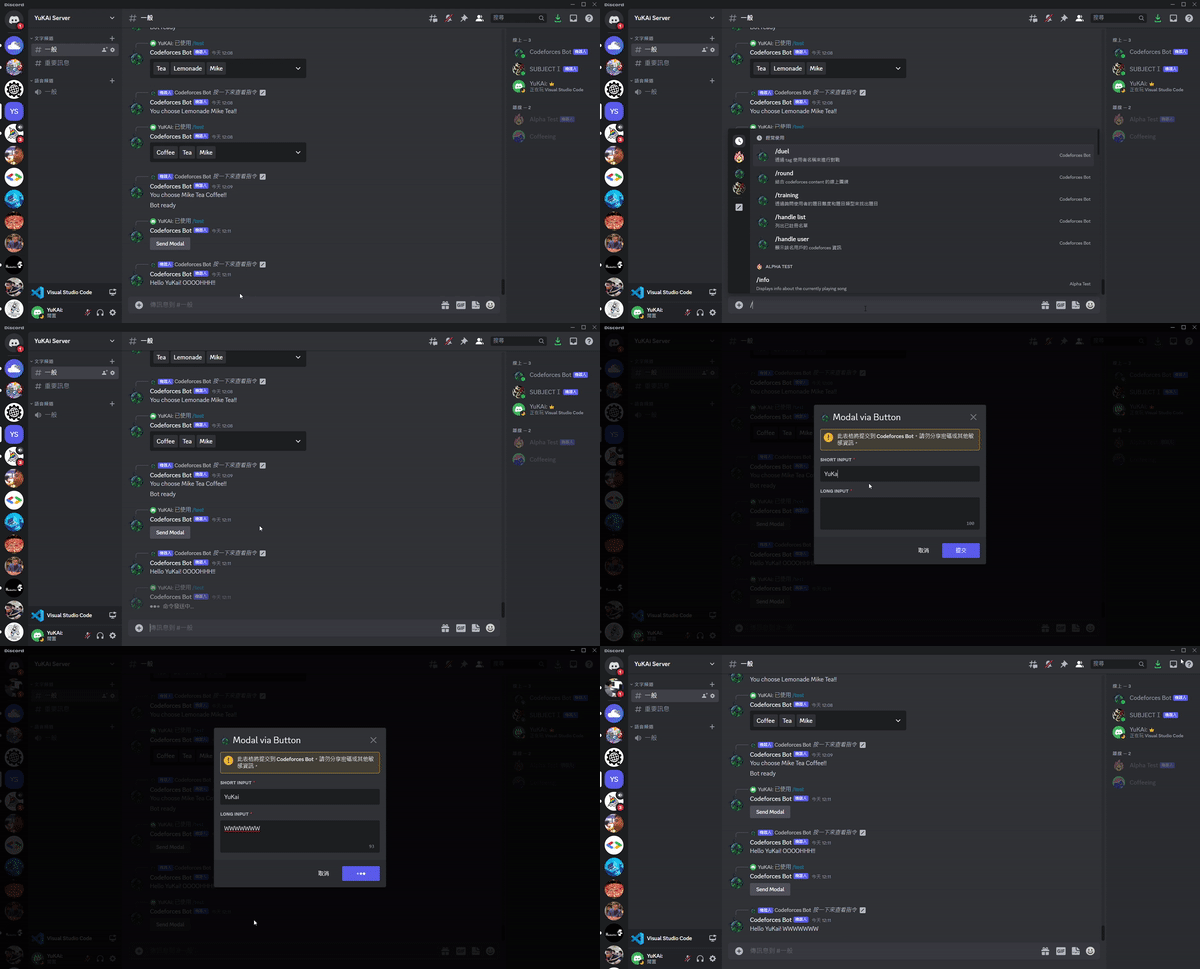
discord.ui.Model 類別實現這類元件,效果是彈出視窗的表單填寫。
以下是簡單實現一個表單的功能,目前只能使用 discord.ui.TextInput
class MyModal(discord.ui.Modal):
    def __init__(self, *args, **kwargs):
        super().__init__(*args, **kwargs)

    name = discord.ui.TextInput(label="Short Input")
    descrpition = discord.ui.TextInput(label="Long Input", style=discord.TextStyle.long, max_length=100)

    async def on_submit(self, interaction: discord.Interaction):
        await interaction.response.send_message(f"Hello {self.name}! {self.descrpition}")
當然也可以用 add_item 的方式將 discord.ui.TextInput 加入,但取出方式就需要用到 self.children
class MyModal(discord.ui.Modal):
    def __init__(self, *args, **kwargs):
        super().__init__(*args, **kwargs)
        self.add_item(discord.ui.TextInput(label="Short Input"))
        self.add_item(discord.ui.TextInput(label="Long Input", style=discord.TextStyle.long, max_length=100))

    async def on_submit(self, interaction: discord.Interaction):
        await interaction.response.send_message(f"Hello {self.children[0].value}! {self.children[1].value}")
接下來有個關鍵的重點,我們雖然已經設定好 model 了,但不能當作 view 傳給 contest,而是要藉由 UI 元件傳遞,雖然也可以使用 slash commands 來傳遞,但還是覺得用 UI 元件傳遞比較適合
class MyView(discord.ui.View):
    def __init__(self):
        super().__init__()

    @discord.ui.button(label="Send Modal")
    async def button_callback(self, interaction: discord.Interaction, button):
        await interaction.response.send_modal(MyModal(title="Modal via Button"))
        # 透過 button 的 interaction 傳遞 modal

資料來源
comments powered by Disqus